Anthony Thomas
The Romeo 1 Pro exists because the first Romeo 1 was not good enough.
Sig knew it, too. The Pro version got an aluminium housing instead of the old design, a glass lens, a brighter emitter, four times the battery life, a steel shroud in the box, and a whole new zeroing system called TruHold, built specifically to stop the sight losing its zero.
It also moved to the DeltaPoint Pro footprint, the same cut the Army chose for the M17. On paper, it is the Romeo 1 with every known complaint answered.
So do Sig Romeo 1 Pro problems still exist? Yes, but they are a shorter and more interesting list than the original’s.
The battery cap on top of the sight has a habit of loosening under recoil, and Sig warns you about it in the manual.
Some units drink batteries or drift vertically. The protective shroud that makes the sight tough also makes its buttons awkward.
And the footprint change that fixed the mounting story created a new one, because this sight does not fit the old Romeo 1 cut, and it does not fit every DeltaPoint Pro cut either.
Let us go through them properly.
Quick verdict: A good Romeo 1 Pro is a genuinely strong duty style optic. One tester threw his test gun away from him repeatedly, dropped it on each side, dunked it in water for half an hour, and the sight held zero and kept working.
The problems below are mostly about setup and a minority of faulty units, not about the design being fragile. Fit it correctly, torque the battery cap the way the manual tells you, and check that cap every 500 rounds.
Do that, and most owners never meet this list.
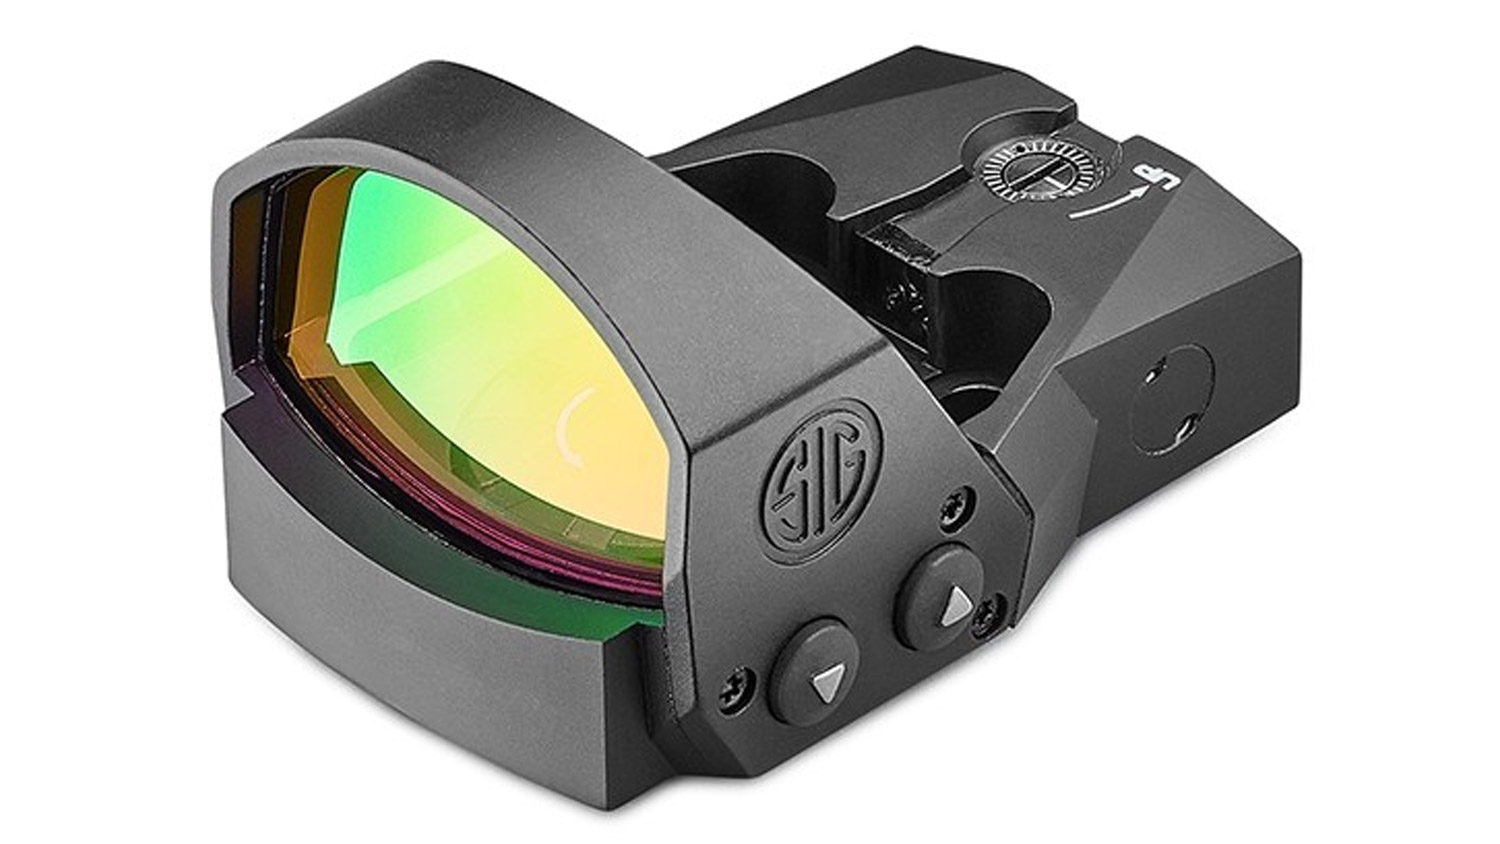
Table of Contents
Sig Romeo 1 Pro Specs
Reticle: 3 MOA or 6 MOA red dot. Magnification: 1x, 30 mm clear aperture.
Lens: molded glass aspheric lens. Housing: aircraft grade CNC aluminium.
Battery: one CR1632, top loaded under a screw cap. Battery cap torque: 10 to 12 in-lb, per the Sig manual.
Claimed battery life: 20,000 plus hours. Illumination: 12 settings, 10 daytime and 2 night vision, side buttons.
Activation: MOTAC motion activation, sleeps after about 2 minutes still. Footprint: Sig PRO footprint, DeltaPoint Pro pattern.
Fits: M17, M18, P320 X series, XFive Legion, Pro Cut and Pro series slides. Does not fit: slides cut for the original Romeo 1.
Adjustment: TruHold lockless zeroing, 1 MOA clicks, 100 MOA windage and elevation. Waterproof rating: IPX7, immersion to 1 metre.
Protection: steel shroud included in the box, optional to fit. Size: 1.83 inches long, 1.25 inches wide, 1.08 inches high.
Weight: 1.0 oz. Warranty: Infinite Guarantee, 5 years on electronic components.
Sig Romeo 1 Pro Problems at a Glance
Battery cap loosens, dot loses power. This is common if the cap is hand tightened, and high seriousness.
Yes, you can fix it yourself. It is free, ten minutes with the right tool.
Battery drains faster than claimed. This is reported on some units, and medium to high seriousness.
You can sometimes fix it yourself. It costs a battery, or free under warranty.
Vertical zero drift, running out of elevation. This affects a minority of units, and is high seriousness when it happens.
You can diagnose it yourself, but not repair it. It is free under warranty.
Buttons hard to reach with the shroud on. This is a common complaint, and low seriousness.
You work around it. It is free.
Footprint confusion, wrong cut or wrong screws. This is a common buyer mistake, and medium seriousness.
Yes, you can fix it before you buy. It is free if you check first.
Strong blue lens tint, top setting too bright. This affects every unit, by design, and is low seriousness.
You adjust the settings. It is free.
1. The Battery Cap Loosens Under Recoil and the Dot Loses Power
Start with the problem Sig tells you about itself, in its own manual, which should tell you how real it is.
The Romeo 1 Pro’s battery sits on top of the sight under a screw cap. That is the good news, because it means no removing the optic to change a battery, unlike its little brother the Romeo Zero.
The catch is in the manual’s battery section.
Sig gives an optimal torque for that cap: 10 to 12 in-lb. Then it tells you to check the cap approximately every 500 rounds to make sure it is still tight.
Then it explains why, in the plainest language a manual ever uses: installing the cap without sufficient torque may cause it to loosen under recoil, and may cause power loss to the red dot.
Owner reports match the warning. Problem roundups describe caps that come loose often, dots that fail afterwards, sights that work again for a while after a fiddle and then go out for good, and in the worst accounts, buttons that stop responding after a few rounds.
That progression makes sense once you understand the mechanism. A cap that is a quarter turn loose gives you an intermittent connection.
Intermittent power on a microprocessor controlled optic does not just dim the dot. It confuses the whole sight.
How to fix a Romeo 1 Pro battery cap problem
- Torque the cap properly, once. 10 to 12 in-lb, using the large flat end of the adjustment tool that came with the sight, or a small torque driver. Start the cap carefully by hand first. The manual warns about damaging the cap threads, and cross threading a fine thread on an aluminium sight is a miserable way to spend an evening.
- Witness mark the cap. A tiny paint line from the cap onto the housing. If the cap starts walking loose under recoil, you will see the line break during cleaning instead of finding out at the range.
- Add the cap to your 500 round routine. Sig literally prints this interval in the manual. Every time the gun gets a proper clean, the cap gets a check. Ten seconds.
- Keep a spare battery in the tool. This is the detail owners forget. The Romeo 1 Pro’s adjustment tool has a spare battery compartment built into it. A spare CR1632 lives there happily, and it turns a dead dot at the range from a ruined session into a two minute pause.
- If the dot still dies with a tight cap and a fresh battery, stop tinkering. Repeated power loss with the cap proven tight is not a cap problem any more. That unit goes back to Sig, and the warranty section at the end of this article explains why that is a better outcome than it sounds.
2. Battery Drains Faster Than 20,000 Hours, and MOTAC Never Really Sleeps
Sig claims 20,000 plus hours of runtime for this sight. That is over two years of constant use, and the number rests on MOTAC, the motion sensor that puts the dot to sleep when the gun sits still and wakes it the moment it moves.
Reviewers with stopwatches confirmed the system works, sleeping after about two minutes of stillness and waking on the first movement, every time they tested it.
Now think about a carried gun. It moves all day.
Walking, driving, sitting down, standing up, all of it is motion, and the sensor is sensitive enough that testers found even a car’s vibration wakes the sight.
So a duty or carry Romeo 1 Pro may spend most of its life awake, living on the constant on version of that battery figure rather than the sleep assisted one.
Owner problem reports fill in the rest of the picture: batteries replaced noticeably more often than on comparable sights, and some units draining fast enough that the owners sent them back, on the reasonable grounds that a fresh battery dying in weeks is a fault, not a consumable.
One tester could not make his dot flicker or flutter even with hot plus P ammunition, which is worth saying out loud.
Plenty of these sights run exactly as advertised.
How to deal with Romeo 1 Pro battery drain
- Rule out the cap first. A loose cap mimics battery drain perfectly, because the dot dies, you fiddle with the sight, it comes back, and it dies again. Torque the cap to spec and mark it before you blame the battery or the electronics.
- Fit one fresh, name brand CR1632 and date it. Write the date in your range log. Vague impressions about short battery life convince nobody, including Sig’s warranty team. Dates and numbers do.
- Turn it off properly for storage. Press and hold either brightness button for over a second and the sight shuts down fully, not just to sleep. For a gun going into a safe for a month, that is the right setting. It returns to your last brightness level when you turn it back on.
- Judge it against carry reality, not the box. If you carry the gun daily and get a year from a battery, your sight is behaving normally, whatever the 20,000 hour figure made you hope for. If you are getting weeks, you are not.
- Weeks means warranty. Abnormal drain is a recognised fault pattern on this model, and owners who sent such units back got them repaired or replaced. Send it in with your dates written down.
3. Vertical Zero Drift, and Guns That Run Out of Elevation
This is the most serious problem on the list, and also the one that needs the most care, because most Romeo 1 Pros hold zero very well.
Context first. The TruHold zeroing system, twin adjustment springs designed to take recoil and return to zero shot after shot, exists because holding zero was the original Romeo 1’s weakness.
On the Pro, the adjustments are proper 1 MOA clicks, and there is a reference line on the turrets so you can see each adjustment instead of relying on hearing clicks through ear protection, which is a genuinely thoughtful touch.
The durability test already mentioned, a gun thrown, dropped on every side, and soaked, held its zero throughout.
Against that background, the reports stand out. Owner problem guides describe units whose vertical zero drifts severely, and a nastier variant where the gun cannot be zeroed at all: elevation wound to its maximum and the shots still landing roughly 1.5 to 2 inches low at about 15 yards.
A sight that does either of those things is not a sight you fix with patience.
It has a faulty adjustment mechanism, and the correct address for it is Sig, not your workbench.
How to handle a drifting Romeo 1 Pro zero
- Prove it is the sight before you blame it. Shoot from a solid rest, one brand and weight of ammunition, at a fixed distance. Check the mounting screws and the battery cap while you are there. Shooter error and loose mounts produce exactly the same target picture as a drifting sight, and they are far more common.
- Use the turret reference lines and keep a settings log. Record your windage and elevation positions after zeroing. If the numbers on the turrets have not moved but the point of impact has, you have real evidence of internal drift, and that evidence is gold in a warranty conversation.
- A diagnostic shim is allowed, a permanent shim is a confession. If your gun runs out of elevation, a thin shim under one end of the sight can confirm the diagnosis in one range trip. If the shim fixes it, the sight or the slide cut is out of spec, and that is a conversation with Sig, because a duty optic should zero within its own 100 MOA of travel.
- Send a proven drifter back. Do not spend months re-zeroing it every session and calling that normal. It is not normal for this model, and Sig’s guarantee exists for exactly this.
4. The Brightness Buttons Are Awkward, and the Shroud Makes Them Worse
The Romeo 1 Pro’s buttons live on the left side of the housing, up and down arrows, hold either for a second to switch on or off. The buttons themselves are fine, testers describe a tactile, audible click.
The problem is getting a finger to them, and the problem has a name: the steel shroud.
That shroud is a thick protective shell that fits over the aluminium housing, and it earns its place. It is a big part of why these sights survive being dropped on concrete.
But it wraps the sides of the sight, and it narrows the space around the buttons considerably.
GunsAmerica’s reviewer called the buttons his one complaint about the whole optic: with the shroud on, his large fingers could barely reach them, and they take a real push. GunMag Warehouse noted the same thing twice, the steel hood provides excellent protection and makes the buttons tough to reach, in the same review that praised almost everything else.
How to live with the Romeo 1 Pro buttons
- Set your brightness before you fit the shroud. Do your zeroing and brightness setup with the bare sight, when your fingers fit, then fit the shroud last. Most owners set brightness rarely after the first week anyway, thanks to MOTAC.
- Use a fingertip, not a thumb. Or the edge of the adjustment tool. The buttons respond to a firm, precise press, and fumbling with a thumb pad is where the frustration lives.
- Decide whether you need the shroud at all. It is optional, and Sig includes it rather than fitting it permanently for a reason. A range and competition gun that lives in a padded case may never need it, and without it the buttons are perfectly ordinary. A duty gun that gets knocked against door frames and car doors should wear it, and its owner should accept the buttons as the price.
5. Footprint Confusion: It Will Not Fit Your Old Romeo 1 Cut, and Not Every DeltaPoint Cut Suits It

More Romeo 1 Pro disappointment happens before the first shot than after it, in the five minutes when an owner tries to fit the sight and it does not sit right.
Here is the story. The original Romeo 1 used its own footprint.
For the Pro, Sig changed to the Leupold DeltaPoint Pro pattern, because the Army’s M17 is cut for that footprint and Sig wanted the military and duty market.
Sensible decision. Two consequences follow, and Sig prints both of them.
First, the Romeo 1 Pro is flatly not compatible with slides cut for the standard Romeo 1, so an owner upgrading from the old sight to the Pro cannot reuse the same slide cut without an adapter. Second, and this one catches people out, Brownells’ listing repeats Sig’s warning that the sight will not fit all DeltaPoint Pro footprints in the industry, because of variances in recoil boss dimensions.
DeltaPoint pattern is a family resemblance, not a guarantee.
There is a smaller, sadder version of the same story in the owner reviews: a P320 buyer whose package arrived without the correct mounting screws for his slide, who waited about three weeks on customer service for the right ones, and who eventually gave up, bought a competitor’s optic, and fitted it on an aftermarket plate instead.
One case is not a pattern, but it is a reminder that screws are part of the footprint story too.
How to avoid Romeo 1 Pro fitting problems
- Identify your cut before you order. Pro cut, Pro series, or a genuine DeltaPoint Pro pattern cut are what you need. A standard Romeo 1 cut is not, full stop.
- Dry fit before you torque anything. The sight should sit flat and locate on its recoil bosses without force, rocking, or a gap. If you have to persuade it down with the screws, something is wrong, and the screws will lose that argument under recoil.
- Use the screws meant for your slide. If the box screws do not match your slide, stop and get the right ones, from Sig or a quality aftermarket plate maker, rather than running a screw that almost fits.
- Consider a plate as the flexible option. On a slide with a true DeltaPoint Pro cut that is slightly out of spec for the Sig, a quality adapter plate often solves the fit cleanly, at the cost of a little extra height.
6. The Lens Has a Strong Blue Tint, and the Brightest Setting Is Too Bright
This one is a characteristic rather than a fault, but buyers deserve to hear it from us instead of discovering it in the car park.
The Romeo 1 Pro’s glass is heavily coated, and the tint is not subtle. GunMag Warehouse’s tester put it in one sentence: the lens has a very visible blue tint.
Some shooters never notice it after the first session. Others find it colours everything they look at through the window, permanently.
It is the same family of coatings that gives the sight its light transmission and its very bright dot, so there is no version of this sight without it.
That dot brightness cuts both ways too. The upgraded point source emitter is far brighter than the original Romeo 1’s, which is excellent in full sun.
The same tester who praised its brightness found the highest setting too bright, even at high noon in Florida, which is about the harshest natural light test North America offers.
If the top setting washes out for him there, it will wash out for you anywhere.
How to set up around the tint and brightness
- Run one or two settings below maximum outdoors. You lose nothing in daylight and the dot stays a dot instead of becoming a flare.
- Look through one before you buy, if you can. Tint sensitivity is personal. Five seconds at a shop counter tells you more than fifty reviews, including this one.
- Know your alternatives if tint bothers you. It is a fair reason to choose differently. The Trijicon RMR has a tint of its own, honestly, while the Holosun 507C X2’s glass is noticeably more neutral to many eyes, and it also gives you a circle dot reticle and a solar backup. If you are cross shopping the duty dot class, that comparison is worth your time.
Sig Romeo 1 Pro Problems That Are Not Really Faults
MOTAC feels broken when the sight is switched off. If you hold a button down and turn the sight fully off, it will not wake on motion.
That is not a MOTAC failure, it is the design working as printed. MOTAC only sleeps and wakes a sight that is switched on.
One button hold turns it on again.
The shroud makes the gun bulkier in the holster. It does, because it is a steel shell around the optic.
It is also optional, and removable in minutes. Bulk you chose is not a defect.
It does not feel like the old Romeo 1. Correct, and deliberate.
Sig quadrupled the battery life, changed the housing material, changed the zeroing system, and changed the footprint between the two sights. Almost nothing you learned about the original carries over, including, unfortunately, your slide cut.
Sig Romeo 1 Pro Maintenance Checklist
- Torque the battery cap to 10 to 12 in-lb, and witness mark it
- Check the battery cap every 500 rounds, as the manual instructs
- Keep a spare CR1632 in the adjustment tool’s battery compartment
- Date every new battery in your range log
- Log your turret settings after zeroing, so drift is provable if it happens
- Clean the lens with a lens cloth, and blow out the open emitter after dusty sessions
- Turn the sight fully off, one second button hold, before long term storage
- Reconfirm zero once a year, or after any hard knock, shroud or not
Is the Sig Romeo 1 Pro Still Worth Buying?
Yes, and more confidently than its little brother, because Sig’s warranty story on this line is genuinely good.
The honest high point comes from Gun Tests magazine. Their team once dropped a Sig red dot on concrete, broke it, and phoned Sig fully admitting it was their own fault.
Sig sent another one, quickly. That is the Electro Optics Infinite Guarantee working exactly as advertised, and it changes the maths on every problem in this article.
A drifting unit, a draining unit, a dead unit: these are inconveniences with a known ending, not money down a hole.
Buy the Romeo 1 Pro if your slide has the right cut, you want a big window and a bright dot, and you like the idea of a steel shroud on a working gun. Respect the two habits it asks of you, cap torque and a 500 round cap check, and it will most likely be a fit and forget optic with a proper safety net underneath it.
Just check your footprint twice before the box arrives, because the one problem Sig cannot fix for you is the wrong slide.
Conclusion
Sig Romeo 1 Pro problems make an odd list, because the sight itself is tough. The failures cluster around the edges of the design: a battery cap that needs proper torque and a regular check, a motion sensor whose battery maths assume your gun sits still more than yours does, buttons hiding behind the very shroud that makes the sight durable, and a footprint change that stranded owners of the original Romeo 1.
None of that should put you off, as long as you walk in knowing it. Check your slide cut before you buy. Torque the cap the way the manual says, and check it when Sig tells you to.
Keep a spare battery in the tool, where Sig thoughtfully gave it a home.
And if your particular unit drifts, drains, or dies anyway, use the guarantee, because on the evidence of the people who have tested it, Sig honours it properly.
That is a better position than most optics leave you in, and it is why this sight keeps its place on duty guns despite everything on this list.
Sources used for this article: the Sig Romeo 1 Pro user manual, Sig and Brownells product and compatibility material, and hands on reviews and tests from GunsAmerica, GunMag Warehouse, SSUSA, Gun Tests, GunAnalyst, and RedDotHeaven. Last updated: October 2026.